Tại sao các loại đầu vào?
Các loại đầu vào bảng phím giúp chúng nhận được đầu vào yêu cầu từ người dùng. Nó loại bỏ các khóa không mong muốn và bao gồm những khóa cần thiết. Chúng tôi có thể đặt loại đầu vào mà người dùng có thể cung cấp bằng cách sử dụng thuộc tính bàn phím của UITextField.
- Ví dụ: textField. keyboardType = UIKeyboardTypeDefault
Các kiểu nhập bàn phím
| Sr.No. | Loại đầu vào & Mô tả |
| 1 | UIKeyboardTypeASCIICapable Bàn phím bao gồm tất cả các ký tự ASCII tiêu chuẩn. |
| 2 | UIKeyboardTypeNumbersAnd Dấu chấm câu Bàn phím hiển thị số và dấu chấm câu khi nó được hiển thị. |
| 3 | UIKeyboardTypeURL Bàn phím được tối ưu hóa cho mục nhập URL. |
| 4 | UIKeyboardTypeNumberPad Bàn phím được sử dụng để nhập mã PIN và hiển thị bàn phím số. |
| 5 | UIKeyboardTypePhonePad Bàn phím được tối ưu hóa để nhập số điện thoại. |
| 6 | UIKeyboardTypeNamePhonePad Bàn phím được sử dụng để nhập tên hoặc số điện thoại. |
| 7 | UIKeyboardTypeEmailAddress Bàn phím được tối ưu hóa để nhập địa chỉ email. |
| 8 | UIKeyboardTypeDecimalPad Bàn phím được sử dụng để nhập số thập phân. |
| 9 | UIKeyboardTypeTwitter Bàn phím được tối ưu hóa cho twitter với ký hiệu @ và #. |
Thêm một phương pháp tùy chỉnh addTextFieldWithDierenceKeyboard
(void) addTextFieldWithDifferentKeyboard {

   UITextField *textField1= [[UITextField alloc]initWithFrame:
   CGRectMake(20, 50, 280, 30)];
   textField1.delegate = self;
   textField1.borderStyle = UITextBorderStyleRoundedRect;
   textField1.placeholder = @"Default Keyboard";
   [self.view addSubview:textField1];

   UITextField *textField2 = [[UITextField alloc]initWithFrame:
   CGRectMake(20, 100, 280, 30)];
   textField2.delegate = self;
   textField2.borderStyle = UITextBorderStyleRoundedRect;
   textField2.keyboardType = UIKeyboardTypeASCIICapable;
   textField2.placeholder = @"ASCII keyboard";
   [self.view addSubview:textField2];

   UITextField *textField3 = [[UITextField alloc]initWithFrame:
   CGRectMake(20, 150, 280, 30)];
   textField3.delegate = self;
   textField3.borderStyle = UITextBorderStyleRoundedRect;
   textField3.keyboardType = UIKeyboardTypePhonePad;
   textField3.placeholder = @"Phone pad keyboard";
   [self.view addSubview:textField3];

   UITextField *textField4 = [[UITextField alloc]initWithFrame:
   CGRectMake(20, 200, 280, 30)];
   textField4.delegate = self;
   textField4.borderStyle = UITextBorderStyleRoundedRect;
   textField4.keyboardType = UIKeyboardTypeDecimalPad;
   textField4.placeholder = @"Decimal pad keyboard";
   [self.view addSubview:textField4];

   UITextField *textField5= [[UITextField alloc]initWithFrame:
   CGRectMake(20, 250, 280, 30)];
   textField5.delegate = self;
   textField5.borderStyle = UITextBorderStyleRoundedRect;
   textField5.keyboardType = UIKeyboardTypeEmailAddress;
   textField5.placeholder = @"Email keyboard";
   [self.view addSubview:textField5];

   UITextField *textField6= [[UITextField alloc]initWithFrame:
   CGRectMake(20, 300, 280, 30)];
   textField6.delegate = self;
   textField6.borderStyle = UITextBorderStyleRoundedRect;
   textField6.keyboardType = UIKeyboardTypeURL;
   textField6.placeholder = @"URL keyboard";
   [self.view addSubview:textField6];
}
Cập nhật viewDidLoad trong ViewController.m như sau:
(void)viewDidLoad {
   [super viewDidLoad];
   //The custom method to create textfield with different keyboard input
   [self addTextFieldWithDifferentKeyboard];
   //Do any additional setup after loading the view, typically from a nib
}
Đầu ra
Khi chúng tôi chạy ứng dụng, sẽ nhận được kết quả sau:
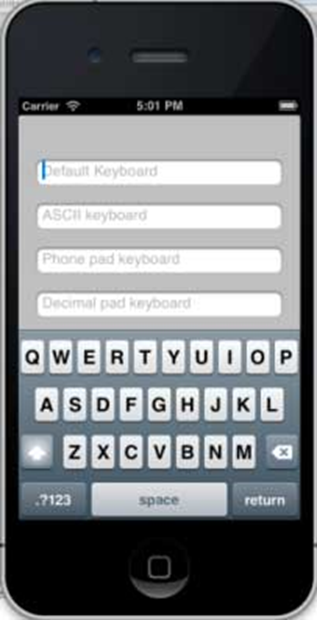
ta sẽ thấy các bàn phím khác nhau được hiển thị khi chọn từng trường văn bản.
iOS – Các nút
Sử dụng các nút
Các nút được sử dụng để xử lý các hành động của người dùng. Nó chặn các sự kiện chạm và gửi tin nhắn đến đối tượng mục tiêu.Nút hình tròn
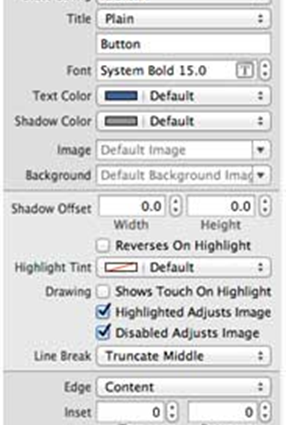
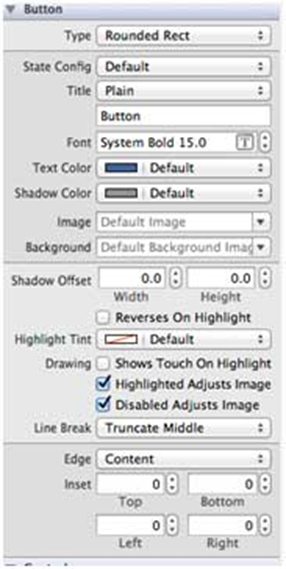
Thuộc tính nút trong xib
Bạn có thể thay đổi các thuộc tính của nút trong xib trong trình kiểm tra thuộc tính trong khu vực tiện ích (bên phải của Cửa sổ).
Các loại nút
- UIButtonTypeCustom
- UIButtonTypeRoundsRect
- UIButtonTypeDetailDisclosure
- UIButtonTypeInfoLight
- UIButtonTypeInfoDark
- UIButtonTypeContactAdd
Thuộc tính quan trọng
- imageView
- titleLabel
Các phương pháp quan trọng
+ (id)buttonWithType:(UIButtonType)buttonType
- (UIImage *)backgroundImageForState:(UIControlState)state
- (UIImage *)imageForState:(UIControlState)state
- (void)setTitle:(NSString *)title forState:(UIControlState)state
- (void)addTarget:(id)target action:(SEL)action forControlEvents: (UIControlEvents) controlEvents
Thêm một phương thức tùy chỉnh addDierenceTypesOfButton
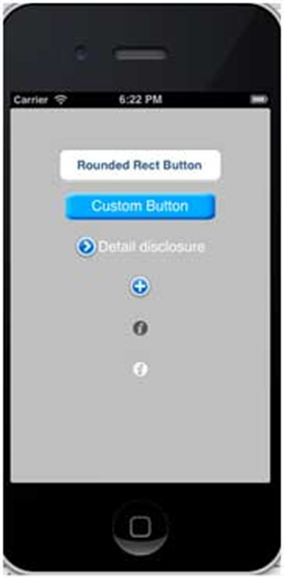
-(void)addDifferentTypesOfButton {
   // A rounded Rect button created by using class method
   UIButton *roundRectButton = [UIButton buttonWithType:
   UIButtonTypeRoundedRect];
   [roundRectButton setFrame:CGRectMake(60, 50, 200, 40)];

   // sets title for the button
   [roundRectButton setTitle:@"Rounded Rect Button" forState:
   UIControlStateNormal];
   [self.view addSubview:roundRectButton];

   UIButton *customButton = [UIButton buttonWithType: UIButtonTypeCustom];
   [customButton setBackgroundColor: [UIColor lightGrayColor]];
   [customButton setTitleColor:[UIColor blackColor] forState:
   UIControlStateHighlighted];

   //sets background image for normal state
   [customButton setBackgroundImage:[UIImage imageNamed:
   @"Button_Default.png"]
   forState:UIControlStateNormal];

   //sets background image for highlighted state
   [customButton setBackgroundImage:[UIImage imageNamed:
   @"Button_Highlighted.png"]
   forState:UIControlStateHighlighted];
   [customButton setFrame:CGRectMake(60, 100, 200, 40)];
   [customButton setTitle:@"Custom Button" forState:UIControlStateNormal];
   [self.view addSubview:customButton];

   UIButton *detailDisclosureButton = [UIButton buttonWithType:
   UIButtonTypeDetailDisclosure];
   [detailDisclosureButton setFrame:CGRectMake(60, 150, 200, 40)];
   [detailDisclosureButton setTitle:@"Detail disclosure" forState:
   UIControlStateNormal];
   [self.view addSubview:detailDisclosureButton];

   UIButton *contactButton = [UIButton buttonWithType:
   UIButtonTypeContactAdd];
   [contactButton setFrame:CGRectMake(60, 200, 200, 40)];
   [self.view addSubview:contactButton];

   UIButton *infoDarkButton = [UIButton buttonWithType:
   UIButtonTypeInfoDark];
   [infoDarkButton setFrame:CGRectMake(60, 250, 200, 40)];
   [self.view addSubview:infoDarkButton];

   UIButton *infoLightButton = [UIButton buttonWithType:
   UIButtonTypeInfoLight];
   [infoLightButton setFrame:CGRectMake(60, 300, 200, 40)];
   [self.view addSubview:infoLightButton];
}
Lưu ý –
Chúng tôi phải thêm hai hình ảnh có tên là “Button_Default.png” và “Button_Highlighted.png” vào dự án của mình, có thể thực hiện bằng cách kéo các hình ảnh vào vùng điều hướng nơi các tệp dự án của chúng tôi được liệt kê.
Cập nhật viewDidLoad trong ViewController.m như sau:
(void)viewDidLoad {
   [super viewDidLoad];

   //The custom method to create our different types of button is called
	[self addDifferentTypesOfButton];
	//Do any additional setup after loading the view, typically from a nib
}
Đầu ra
Khi chạy ứng dụng, sẽ nhận được kết quả sau: