Sử dụng nhãn
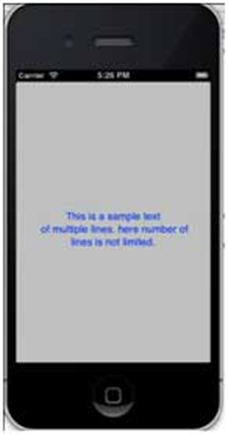
Nhãn được sử dụng để hiển thị nội dung tĩnh, bao gồm một dòng hoặc nhiều dòng.
Thuộc tính quan trọng
- textAlignment
- văn bản màu
- chữ
- numberOflines
- lineBreakMode
Thêm nhãn addLabel của phương pháp tùy chỉnh
-(void)addLabel {
   UILabel *aLabel = [[UILabel alloc]initWithFrame:
   CGRectMake(20, 200, 280, 80)];
   aLabel.numberOfLines = 0;
   aLabel.textColor = [UIColor blueColor];
   aLabel.backgroundColor = [UIColor clearColor];
   aLabel.textAlignment = UITextAlignmentCenter;
   aLabel.text = @"This is a sample text\n of multiple lines.
   here number of lines is not limited.";
   [self.view addSubview:aLabel];
}
Cập nhật viewDidLoad trong ViewController.m như sau:
- (void)viewDidLoad {
   [super viewDidLoad];

   //The custom method to create our label is called
   [self addLabel];
   // Do any additional setup after loading the view, typically from a nib.
}
Đầu ra
Khi chúng tôi chạy ứng dụng, chúng tôi sẽ nhận được kết quả sau:
iOS – Thanh công cụ
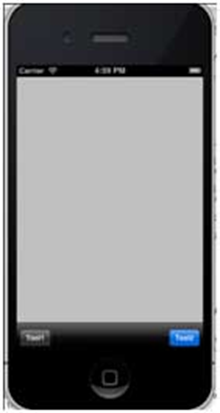
Sử dụng Thanh công cụ
Nếu chúng ta muốn thao tác một cái gì đó dựa trên chế độ xem hiện tại của chúng ta, chúng ta có thể sử dụng thanh công cụ. Ví dụ sẽ là ứng dụng email với một mục hộp thư đến có các tùy chọn để xóa, tạo mục yêu thích, trả lời, v.v. Nó được hiển thị bên dưới.
Thuộc tính quan trọng
- barStyle
- mặt hàng
Thêm một phương thức tùy chỉnh addToolbar
-(void)addToolbar {
   UIBarButtonItem *spaceItem = [[UIBarButtonItem alloc]
   initWithBarButtonSystemItem:UIBarButtonSystemItemFlexibleSpace
   target:nil action:nil];
   UIBarButtonItem *customItem1 = [[UIBarButtonItem alloc]
   initWithTitle:@"Tool1" style:UIBarButtonItemStyleBordered
   target:self action:@selector(toolBarItem1:)];
   UIBarButtonItem *customItem2 = [[UIBarButtonItem alloc]
   initWithTitle:@"Tool2" style:UIBarButtonItemStyleDone
   target:self action:@selector(toolBarItem2:)];
   NSArray *toolbarItems = [NSArray arrayWithObjects:
   customItem1,spaceItem, customItem2, nil];
   UIToolbar *toolbar = [[UIToolbar alloc]initWithFrame:
   CGRectMake(0, 366+54, 320, 50)];
   [toolbar setBarStyle:UIBarStyleBlackOpaque];
   [self.view addSubview:toolbar];
   [toolbar setItems:toolbarItems];
}
Để biết hành động được thực hiện, chúng tôi thêm UILabel trong ViewController.xib của chúng tôi và tạo IBoutlet cho UILabel và đặt tên nó là nhãn .
Chúng ta cũng cần thêm hai phương thức để thực thi các hành động cho các mục trên thanh công cụ như được hiển thị bên dưới.
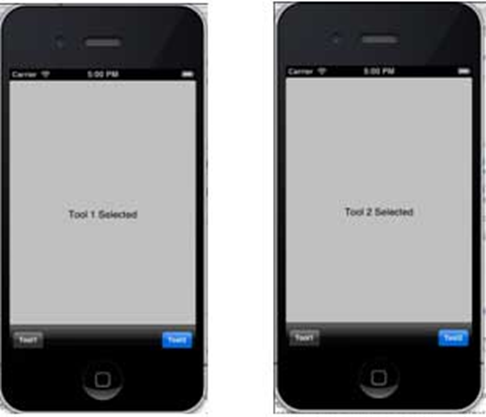
-(IBAction)toolBarItem1:(id)sender {
   [label setText:@"Tool 1 Selected"];
}

-(IBAction)toolBarItem2:(id)sender {
   [label setText:@"Tool 2 Selected"];
}
Cập nhật viewDidLoad trong ViewController.m như sau:
- (void)viewDidLoad {
   [super viewDidLoad];

   // The method hideStatusbar called after 2 seconds
   [self addToolbar];
   // Do any additional setup after loading the view, typically from a nib.
}
Đầu ra
Khi chúng tôi chạy ứng dụng, chúng tôi sẽ nhận được kết quả sau:
Nhấp vào các nút trên thanh tool1 và tool2 và chúng tôi nhận được những điều sau:
iOS – Thanh trạng thái
Sử dụng thanh trạng thái
Thanh trạng thái hiển thị thông tin chính của thiết bị như –
- Mô hình thiết bị hoặc nhà cung cấp mạng
- Sức mạnh mạng
- Thông tin pin
- Thời gian
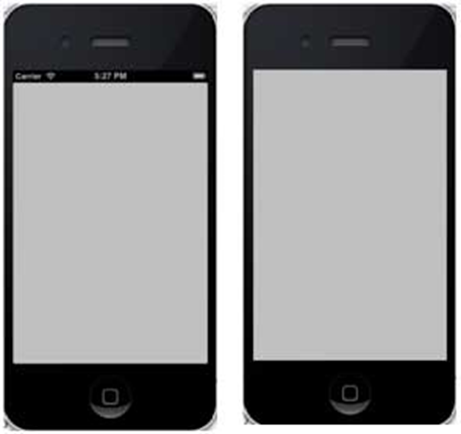
Thanh trạng thái được hiển thị bên dưới.

Phương pháp ẩn thanh trạng thái
[[UIApplication sharedApplication] setStatusBarHidden:YES];
Cách thay thế để ẩn thanh trạng thái
Chúng tôi cũng có thể ẩn thanh trạng thái với sự trợ giúp của info.plist bằng cách thêm một hàng và chọn UIStatusBarHidden và đặt giá trị của nó thành KHÔNG.
Thêm một hideStatusbar phương pháp tùy chỉnh vào Lớp của chúng tôi
Nó ẩn thanh trạng thái hoạt hình và cũng thay đổi kích thước chế độ xem của chúng ta để chiếm không gian thanh trạng thái.
-(void)hideStatusbar {
   [[UIApplication sharedApplication] setStatusBarHidden:YES
   withAnimation:UIStatusBarAnimationFade];
   [UIView beginAnimations:@"Statusbar hide" context:nil];
   [UIView setAnimationDuration:0.5];
   [self.view setFrame:CGRectMake(0, 0, 320, 480)];
   [UIView commitAnimations];
}
Cập nhật viewDidLoad trong ViewController.m như sau:
- (void)viewDidLoad {
   [super viewDidLoad];

   // The method hideStatusbar called after 2 seconds
   [self performSelector:@selector(hideStatusbar)
   withObject:nil afterDelay:2.0];

   // Do any additional setup after loading the view, typically from a nib.
}
Đầu ra ban đầu và đầu ra sau 2 giây