Đặc tính
Dưới đây là các thuộc tính thường được sử dụng của TimePicker.
Sự kiện
Dưới đây là các sự kiện thường được sử dụng trong lớp TimePicker.
Phương pháp
Dưới đây là các phương thức thường được sử dụng trong lớp TimePicker.
Thí dụ
Ví dụ sau đây cho thấy việc sử dụng TimePicker trong ứng dụng XAML. Đây là mã XAML để tạo và khởi tạo TimePicker với một số thuộc tính.
<Page x:Class = "XAMLTimePicker.MainPage"
   xmlns = "http://schemas.microsoft.com/winfx/2006/xaml/presentation"
   xmlns:x = "http://schemas.microsoft.com/winfx/2006/xaml"
   xmlns:local = "using:XAMLTimePicker"
   xmlns:d = "http://schemas.microsoft.com/expression/blend/2008"
   xmlns:mc = "http://schemas.openxmlformats.org/markup-compatibility/2006"
   mc:Ignorable = "d">

   <Grid Background = "{ThemeResource ApplicationPageBackgroundThemeBrush}">
      <StackPanel Orientation = "Horizontal" Height = "60" Margin = "46,67,-46,641">
         <TimePicker x:Name = "arrivalTimePicker" Header = "Arrival Time" Margin = "0,1"/>
         <Button Content = "Submit" Click = "SubmitButton_Click"
            Margin = "5,0,0,-2" VerticalAlignment = "Bottom"/>
         <TextBlock x:Name = "Control1Output" FontSize = "24"/>
      </StackPanel>
   </Grid>

</Page>
Đây là triển khai sự kiện nhấp chuột trong C # –
using System;
using Windows.UI.Xaml;
using Windows.UI.Xaml.Controls;

namespace XAMLTimePicker {
   public sealed partial class MainPage : Page {
      public MainPage() {
         this.InitializeComponent();
      }
      private void SubmitButton_Click(object sender, RoutedEventArgs e) {
         if (VerifyTimeIsAvailable(arrivalTimePicker.Time) == true) {
            Control1Output.Text = string.Format("Thank you. Your appointment is set for {0}.",
               arrivalTimePicker.Time.ToString());
         } else {
            Control1Output.Text = "Sorry, we're only open from 8AM to 5PM.";
         }
      }
      private bool VerifyTimeIsAvailable(TimeSpan time) {
         // Set open (8AM) and close (5PM) times.
         TimeSpan openTime = new TimeSpan(8, 0, 0);
         TimeSpan closeTime = new TimeSpan(17, 0, 0);

         if (time >= openTime && time < closeTime) {
            return true; // Open
         }
         return false; // Closed
      }
   }
}
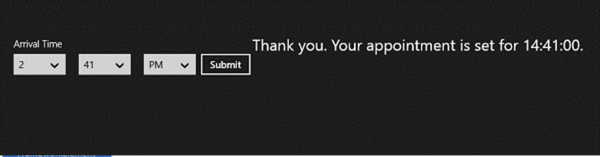
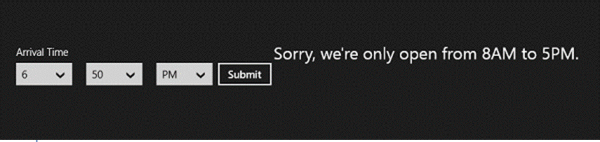
Khi bạn biên dịch và thực thi đoạn mã trên, nó sẽ hiển thị kết quả sau. Khi thời gian được chọn từ 8 giờ sáng đến 5 giờ chiều, nó sẽ hiển thị thông báo sau:
Nếu không, thông báo sau sẽ được hiển thị:
XAML – ToggleButton
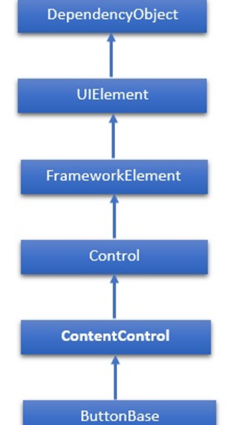
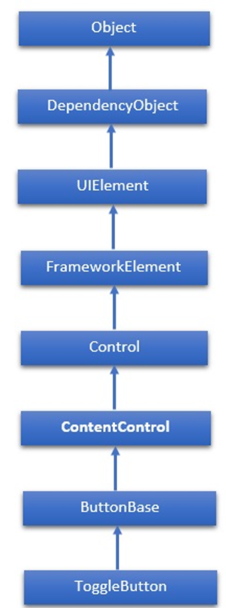
Nút bật tắt là một điều khiển có thể chuyển đổi trạng thái, chẳng hạn như CheckBox và RadioButton. Sự kế thừa phân cấp của lớp ToggleButton như sau:
Đặc tính
Dưới đây là các thuộc tính thường được sử dụng trong lớp ToggleButton.
Sự kiện
Dưới đây là các Sự kiện thường được sử dụng trong lớp ToggleButton.
Thí dụ
Ví dụ sau đây cho thấy việc sử dụng ToggleButton trong một ứng dụng XAML. Đây là mã XAML để tạo và khởi tạo một ToggleButton với một số thuộc tính.
<Page x:Class = "XAMLToggleButton.MainPage"
   xmlns = "http://schemas.microsoft.com/winfx/2006/xaml/presentation"
   xmlns:x = "http://schemas.microsoft.com/winfx/2006/xaml"
   xmlns:local = "using:XAMLToggleButton"
   xmlns:d = "http://schemas.microsoft.com/expression/blend/2008"
   xmlns:mc = "http://schemas.openxmlformats.org/markup-compatibility/2006"
   mc:Ignorable = "d">

   <Grid Background = "{ThemeResource ApplicationPageBackgroundThemeBrush}">
      <StackPanel Orientation = "Vertical">
         <ToggleButton x:Name = "cb2" Content = "Toggle"
            Checked = "HandleCheck" Unchecked = "HandleUnchecked"
            Margin = "100" Width = "100" HorizontalAlignment = "Center"/>

         <TextBlock x:Name = "text2" Margin = "10" Width = "300"
            HorizontalAlignment = "Center" Height = "50" FontSize = "24"/>
      </StackPanel>
   </Grid>

</Page>
Đây là cách triển khai C # của các sự kiện Đã kiểm tra và Không được kiểm tra –
using System;
using Windows.UI.Xaml;
using Windows.UI.Xaml.Controls;

// The Blank Page item template is documented at http://go.microsoft.com/fwlink/?LinkId=234238

namespace XAMLToggleButton {
   /// <summary>
      /// An empty page that can be used on its own or navigated to within a Frame.
   /// </summary>

   public sealed partial class MainPage : Page {
      public MainPage() {
         this.InitializeComponent();
      }
      private void HandleCheck(object sender, RoutedEventArgs e) {
         text2.Text = "Button is Checked";
      }
      private void HandleUnchecked(object sender, RoutedEventArgs e) {
         text2.Text = "Button is unchecked.";
      }
   }
}
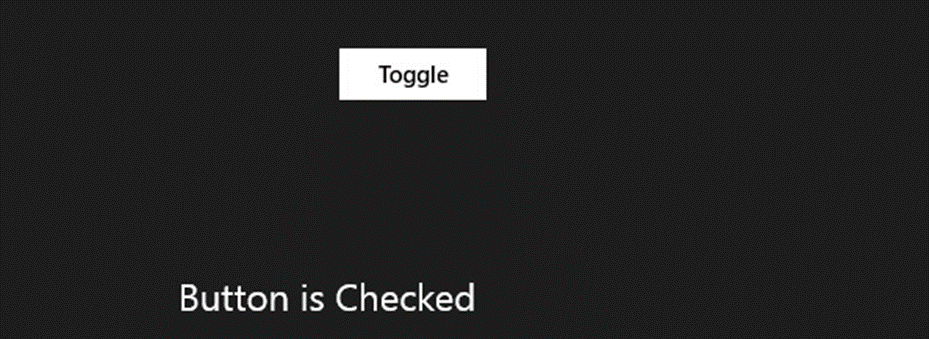
Khi bạn biên dịch và thực thi đoạn mã trên, nó sẽ tạo ra kết quả sau:
XAML – công cụ
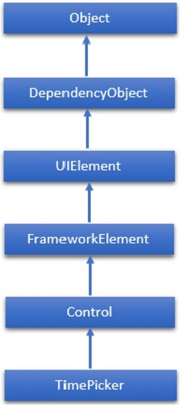
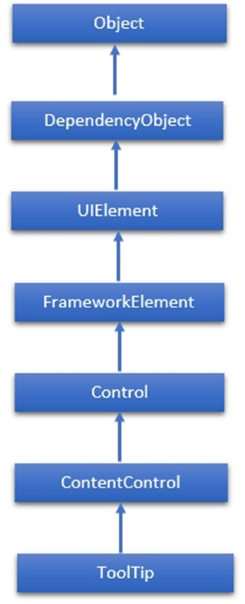
ToolTip là một điều khiển tạo ra một cửa sổ bật lên hiển thị thông tin cho một phần tử trong GUI. Sự kế thừa phân cấp của lớp ToolTip như sau:
Đặc tính
Dưới đây là các thuộc tính thường được sử dụng của lớp ToolTip.
Sự kiện
Dưới đây là các Sự kiện thường được sử dụng của lớp ToolTip.
Thí dụ
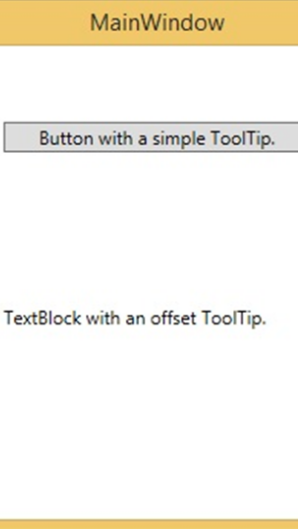
Ví dụ sau đây cho thấy cách sử dụng ToolTip trong ứng dụng XAML. Đây là mã XAML trong đó ToolTip được tạo với một số thuộc tính để hiển thị ToolTip trên Button và TextBlock.
<Window x:Class = "XAMLToolTip.MainWindow"
   xmlns = "http://schemas.microsoft.com/winfx/2006/xaml/presentation"
   xmlns:x = "http://schemas.microsoft.com/winfx/2006/xaml"
   Title = "MainWindow" Height = "350" Width = "604">

   <Grid>
      <StackPanel Orientation = "Vertical">
         <Button Content = "Button with a simple ToolTip."
            ToolTipService.ToolTip = "Simple ToolTip" Width = "200" Margin = "50" />

         <!-- A TextBlock with an offset ToolTip. -->
         <TextBlock Text = "TextBlock with an offset ToolTip." Width = "200" Margin = "50">
            <ToolTipService.ToolTip>
               <ToolTip Content = "Offset ToolTip." HorizontalOffset = "20" VerticalOffset = "30"/>
            </ToolTipService.ToolTip>
         </TextBlock>
      </StackPanel>
   </Grid>

</Window>
Khi đoạn mã trên được biên dịch và thực thi bằng ToolTip on Button và TextBlock, nó sẽ tạo ra kết quả sau: