Máy ảnh là một trong những tính năng phổ biến trên thiết bị di động. Chúng ta có thể chụp ảnh bằng máy ảnh và sử dụng nó trong ứng dụng của mình và nó cũng khá đơn giản.
Quản lý máy ảnh – Các bước liên quan
Bước 1 – Tạo một ứng dụng dựa trên Chế độ xem đơn giản .
Bước 2 – Thêm một nút trong ViewController.xib và tạo IBAction cho nút.
Bước 3 – Thêm một dạng xem ảnh và tạo IBOutlet đặt tên nó là imageView.
Bước 4 – Cập nhật ViewController.h như sau:
#import <UIKit/UIKit.h>

@interface ViewController : UIViewController<UIImagePickerControllerDelegate> {
   UIImagePickerController *imagePicker;
   IBOutlet UIImageView *imageView;
}

- (IBAction)showCamera:(id)sender;
@end
Bước 5 – Cập nhật ViewController.m như sau:
Bước 5 - Cập nhật ViewController.m như sau:
#import "ViewController.h"

@interface ViewController ()
@end

@implementation ViewController

- (void)viewDidLoad {
   [super viewDidLoad];
}

- (void)didReceiveMemoryWarning {
   [super didReceiveMemoryWarning];
   // Dispose of any resources that can be recreated.
}

- (IBAction)showCamera:(id)sender {
   imagePicker.allowsEditing = YES;

   if ([UIImagePickerController isSourceTypeAvailable:
   UIImagePickerControllerSourceTypeCamera]) {
      imagePicker.sourceType = UIImagePickerControllerSourceTypeCamera;
   } else {
      imagePicker.sourceType =
      UIImagePickerControllerSourceTypePhotoLibrary;
   }
   [self presentModalViewController:imagePicker animated:YES];
}

-(void)imagePickerController:(UIImagePickerController *)picker
   didFinishPickingMediaWithInfo:(NSDictionary *)info {
      UIImage *image = [info objectForKey:UIImagePickerControllerEditedImage];

      if (image == nil) {
         image = [info objectForKey:UIImagePickerControllerOriginalImage];
      }
   imageView.image = image;
}

-(void)imagePickerControllerDidCancel:(UIImagePickerController *)picker {
   [self dismissModalViewControllerAnimated:YES];
}
@end
Đầu ra
Khi chúng tôi chạy ứng dụng và nhấp vào nút hiển thị máy ảnh, chúng tôi sẽ nhận được kết quả sau:

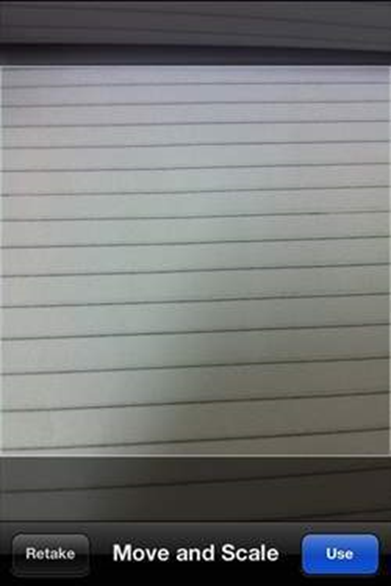
Khi chúng ta chụp ảnh, chúng ta có thể chỉnh sửa ảnh, tức là di chuyển và chia tỷ lệ như hình dưới đây
iOS – Xử lý vị trí
Chúng tôi có thể dễ dàng xác định vị trí hiện tại của người dùng trong iOS, miễn là người dùng cho phép ứng dụng truy cập thông tin với sự trợ giúp của khung vị trí cốt lõi.
Xử lý vị trí – Các bước đã thực hiện
Bước 1 – Tạo một ứng dụng dựa trên Chế độ xem đơn giản.
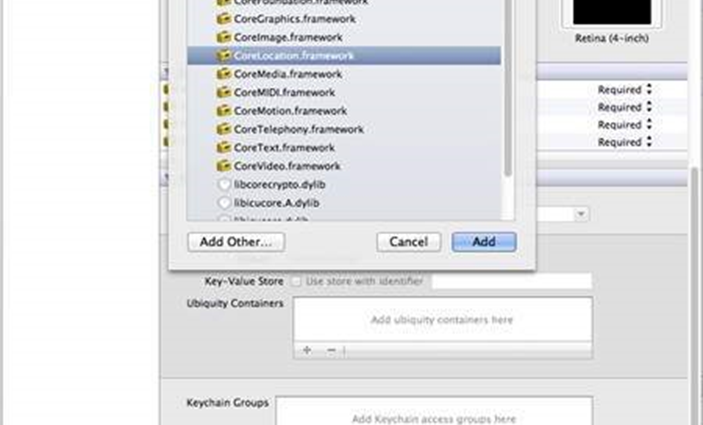
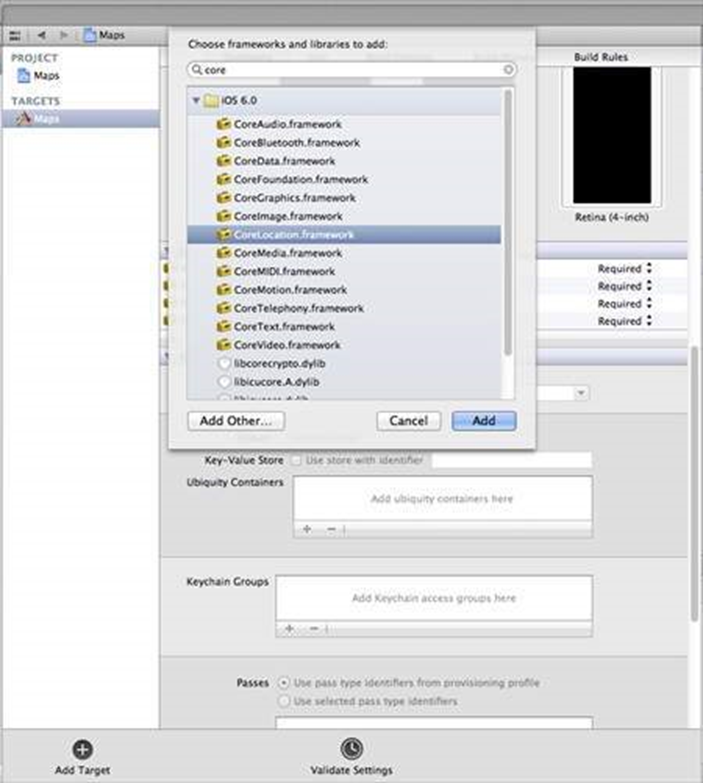
Bước 2 – Chọn tệp dự án của bạn, sau đó chọn mục tiêu và sau đó thêm CoreLocation.framework như hình dưới đây
Bước 3 – Thêm hai nhãn trong ViewController.xib và tạo ibOutlet đặt tên cho các nhãn tương ứng là latitudeLabel và longitudeLabel .
Bước 4 – Tạo một tệp mới bằng cách chọn Tệp → Mới → Tệp … → chọn lớp Objective C và nhấp vào tiếp theo.
Bước 5 – Đặt tên lớp là LocationHandler với “lớp con của” là NSObject.
Bước 6 – Chọn tạo.
Bước 7 – Cập nhật LocationHandler.h như sau:
#import <Foundation/Foundation.h>
#import <CoreLocation/CoreLocation.h>

@protocol LocationHandlerDelegate <NSObject>

@required
-(void) didUpdateToLocation:(CLLocation*)newLocation
   fromLocation:(CLLocation*)oldLocation;
@end
@interface LocationHandler : NSObject<CLLocationManagerDelegate> {
   CLLocationManager *locationManager;
}
@property(nonatomic,strong) id<LocationHandlerDelegate> delegate;

+(id)getSharedInstance;
-(void)startUpdating;
-(void) stopUpdating;

@end
Bước 8 – Cập nhật LocationHandler.m như sau:
#import "LocationHandler.h"
static LocationHandler *DefaultManager = nil;

@interface LocationHandler()

-(void)initiate;

@end

@implementation LocationHandler

+(id)getSharedInstance{
   if (!DefaultManager) {
      DefaultManager = [[self allocWithZone:NULL]init];
      [DefaultManager initiate];
   }
   return DefaultManager;
}

-(void)initiate {
   locationManager = [[CLLocationManager alloc]init];
   locationManager.delegate = self;
}

-(void)startUpdating{
   [locationManager startUpdatingLocation];
}

-(void) stopUpdating {
   [locationManager stopUpdatingLocation];
}

-(void)locationManager:(CLLocationManager *)manager didUpdateToLocation:
   (CLLocation *)newLocation fromLocation:(CLLocation *)oldLocation {
   if ([self.delegate respondsToSelector:@selector
   (didUpdateToLocation:fromLocation:)]) {
      [self.delegate didUpdateToLocation:oldLocation
      fromLocation:newLocation];
   }
}
@end
Bước 9 – Cập nhật ViewController.h như sau, nơi chúng tôi đã triển khai ủy quyền LocationHandler và tạo hai ibOutlet
#import <UIKit/UIKit.h>
#import "LocationHandler.h"

@interface ViewController : UIViewController<LocationHandlerDelegate> {
   IBOutlet UILabel *latitudeLabel;
   IBOutlet UILabel *longitudeLabel;
}
@end
Bước 10 – Cập nhật ViewController.m như sau:
#import "ViewController.h"

@interface ViewController ()
@end

@implementation ViewController

- (void)viewDidLoad {
   [super viewDidLoad];
   [[LocationHandler getSharedInstance]setDelegate:self];
   [[LocationHandler getSharedInstance]startUpdating];
}

- (void)didReceiveMemoryWarning {
   [super didReceiveMemoryWarning];
   // Dispose of any resources that can be recreated.
}

-(void)didUpdateToLocation:(CLLocation *)newLocation
 fromLocation:(CLLocation *)oldLocation {
   [latitudeLabel setText:[NSString stringWithFormat:
   @"Latitude: %f",newLocation.coordinate.latitude]];
   [longitudeLabel setText:[NSString stringWithFormat:
   @"Longitude: %f",newLocation.coordinate.longitude]];
}
@end
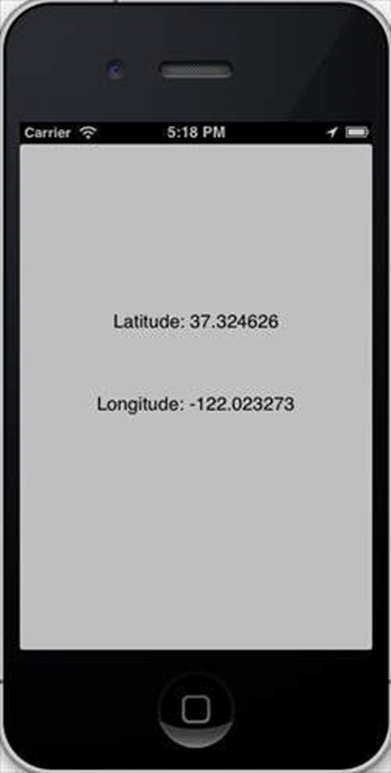
Đầu ra
Khi chúng tôi chạy ứng dụng, chúng tôi sẽ nhận được kết quả sau: