Sử dụng Chế độ xem cuộn
Chế độ xem cuộn được sử dụng để hiển thị nội dung nhiều hơn kích thước của màn hình. Nó có thể chứa tất cả các phần tử giao diện người dùng khác như chế độ xem hình ảnh, nhãn, chế độ xem văn bản và thậm chí cả một chế độ xem cuộn khác.
Thuộc tính quan trọng
- contentSize
- contentInset
- contentOffset
- ủy nhiệm
Các phương pháp quan trọng
Sử dụng Chế độ xem cuộn
Chế độ xem cuộn được sử dụng để hiển thị nội dung nhiều hơn kích thước của màn hình. Nó có thể chứa tất cả các phần tử giao diện người dùng khác như chế độ xem hình ảnh, nhãn, chế độ xem văn bản và thậm chí cả một chế độ xem cuộn khác.
Thuộc tính quan trọng
•	contentSize
•	contentInset
•	contentOffset
•	ủy nhiệm
Các phương pháp quan trọng
- (void)scrollRectToVisible:(CGRect)rect animated:(BOOL)animated
- (void)setContentOffset:(CGPoint)contentOffset animated:(BOOL)animated
Các phương pháp ủy quyền quan trọng
- (void)scrollViewDidEndDecelerating:(UIScrollView *)scrollView
- (void)scrollViewDidEndDragging:(UIScrollView *)scrollView
willDecelerate:(BOOL)decelerate
- (void)scrollViewWillBeginDecelerating:(UIScrollView *)scrollView
- (void)scrollViewWillBeginDragging:(UIScrollView *)scrollView
Cập nhật ViewController.h như sau: Làm cho lớp của bạn tuân theo giao thức đại biểu chế độ xem cuộn bằng cách thêm <UIScrollViewDelegate> và khai báo một thể hiện chế độ xem cuộn như được hiển thị bên dưới trong ViewController.h.
#import <UIKit/UIKit.h>

@interface ViewController : UIViewController<UIScrollViewDelegate> {
   UIScrollView *myScrollView;
}
@end
Thêm một phương pháp tùy chỉnh addScrollView
-(void)addScrollView {
   myScrollView = [[UIScrollView alloc]initWithFrame:
   CGRectMake(20, 20, 280, 420)];
   myScrollView.accessibilityActivationPoint = CGPointMake(100, 100);
   imgView = [[UIImageView alloc]initWithImage:
   [UIImage imageNamed:@"AppleUSA.jpg"]];
   [myScrollView addSubview:imgView];
   myScrollView.minimumZoomScale = 0.5;
   myScrollView.maximumZoomScale = 3;
   myScrollView.contentSize = CGSizeMake(imgView.frame.size.width,
   imgView.frame.size.height);
   myScrollView.delegate = self;
   [self.view addSubview:myScrollView];
}
Lưu ý – Chúng tôi phải thêm một hình ảnh có tên là “AppleUSA1.jpg” vào dự án của mình, có thể thực hiện bằng cách kéo hình ảnh vào khu vực điều hướng của chúng tôi, nơi các tệp dự án của chúng tôi được liệt kê. Hình ảnh phải có độ phân giải cao hơn thiết bị để xem hình ảnh cuộn.
Triển khai các đại biểu scrollView trong ViewController.m
Triển khai các đại biểu scrollView trong ViewController.m
-(UIView *)viewForZoomingInScrollView:(UIScrollView *)scrollView {
   return imgView;
}

-(void)scrollViewDidEndDecelerating:(UIScrollView *)scrollView {
   NSLog(@"Did end decelerating");
}

-(void)scrollViewDidScroll:(UIScrollView *)scrollView {
   // NSLog(@"Did scroll");
}

-(void)scrollViewDidEndDragging:(UIScrollView *)scrollView
   willDecelerate:(BOOL)decelerate {
   NSLog(@"Did end dragging");
}

-(void)scrollViewWillBeginDecelerating:(UIScrollView *)scrollView {
   NSLog(@"Did begin decelerating");
}

-(void)scrollViewWillBeginDragging:(UIScrollView *)scrollView {
   NSLog(@"Did begin dragging");
}
Cập nhật viewDidLoad trong ViewController.m như sau:
(void)viewDidLoad {
   [super viewDidLoad];
   [self addScrollView];
   //Do any additional setup after loading the view, typically from a nib
}
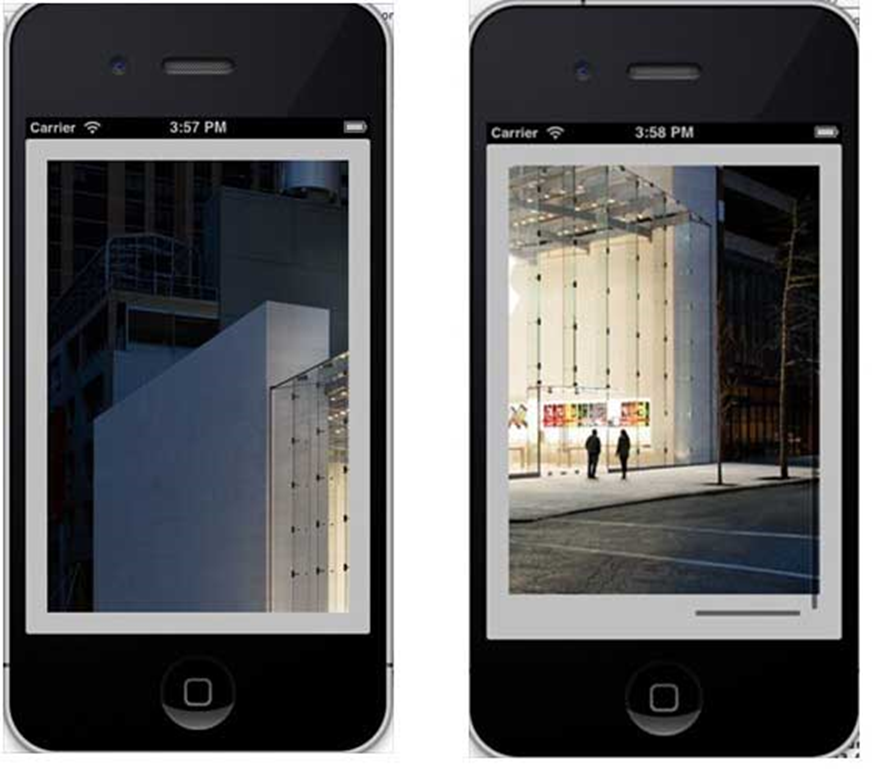
Đầu ra
Khi chúng tôi chạy ứng dụng, chúng tôi sẽ nhận được kết quả sau. Khi bạn cuộn chế độ xem cuộn, bạn sẽ có thể xem phần còn lại của hình ảnh.
iOS – Chế độ xem bảng
Sử dụng Chế độ xem Bảng
Nó được sử dụng để hiển thị chế độ xem có thể cuộn theo chiều dọc bao gồm một số ô (thường là các ô có thể tái sử dụng). Nó có các tính năng đặc biệt như đầu trang, chân trang, hàng và phần.
Thuộc tính quan trọng
- ủy nhiệm
- nguồn dữ liệu
- rowHeight
- sectionFooterHeight
- sectionHeaderHeight
- màu sắc
- tableHeaderView
- tableFooterView
Các phương pháp quan trọng
Sử dụng Chế độ xem Bảng
Nó được sử dụng để hiển thị chế độ xem có thể cuộn theo chiều dọc bao gồm một số ô (thường là các ô có thể tái sử dụng). Nó có các tính năng đặc biệt như đầu trang, chân trang, hàng và phần.
Thuộc tính quan trọng
•	ủy nhiệm
•	nguồn dữ liệu
•	rowHeight
•	sectionFooterHeight
•	sectionHeaderHeight
•	màu sắc
•	tableHeaderView
•	tableFooterView
Các phương pháp quan trọng
- (UITableViewCell *)cellForRowAtIndexPath:(NSIndexPath *)indexPath
- (void)deleteRowsAtIndexPaths:(NSArray *)indexPaths
withRowAnimation:(UITableViewRowAnimation)animation
- (id)dequeueReusableCellWithIdentifier:(NSString *)identifier
- (id)dequeueReusableCellWithIdentifier:(NSString *)identifier
forIndexPath:(NSIndexPath *)indexPath
- (void)reloadData
- (void)reloadRowsAtIndexPaths:(NSArray *)indexPaths
withRowAnimation:(UITableViewRowAnimation)animation
- (NSArray *)visibleCells
Mã mẫu và các bước
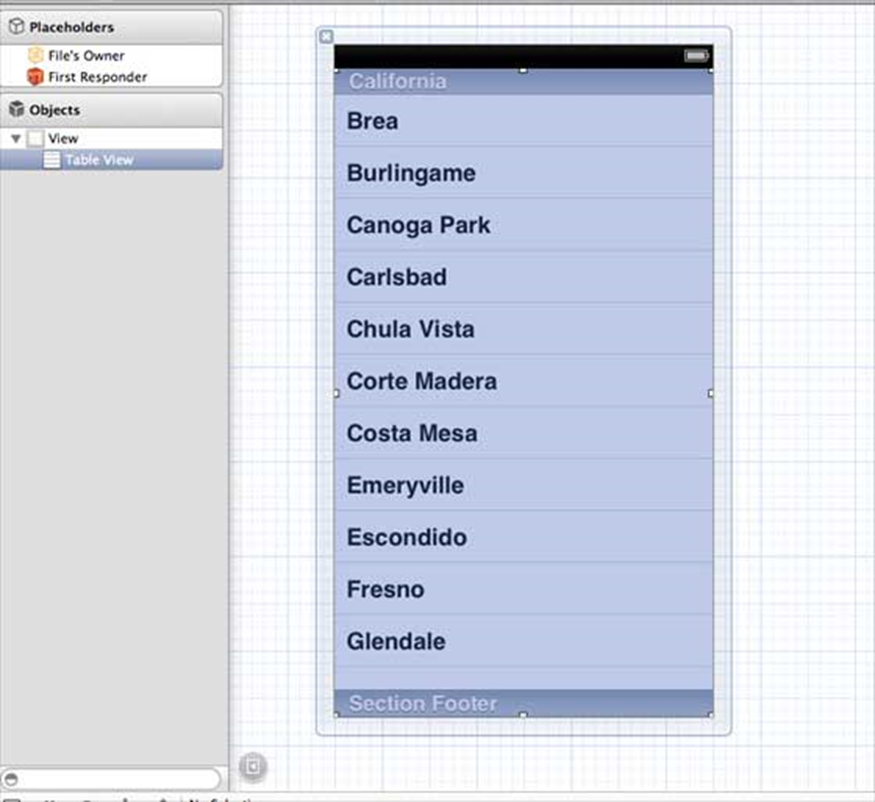
Bước 1 – Hãy thêm một tableview trong ViewController.xib như hình dưới đây.
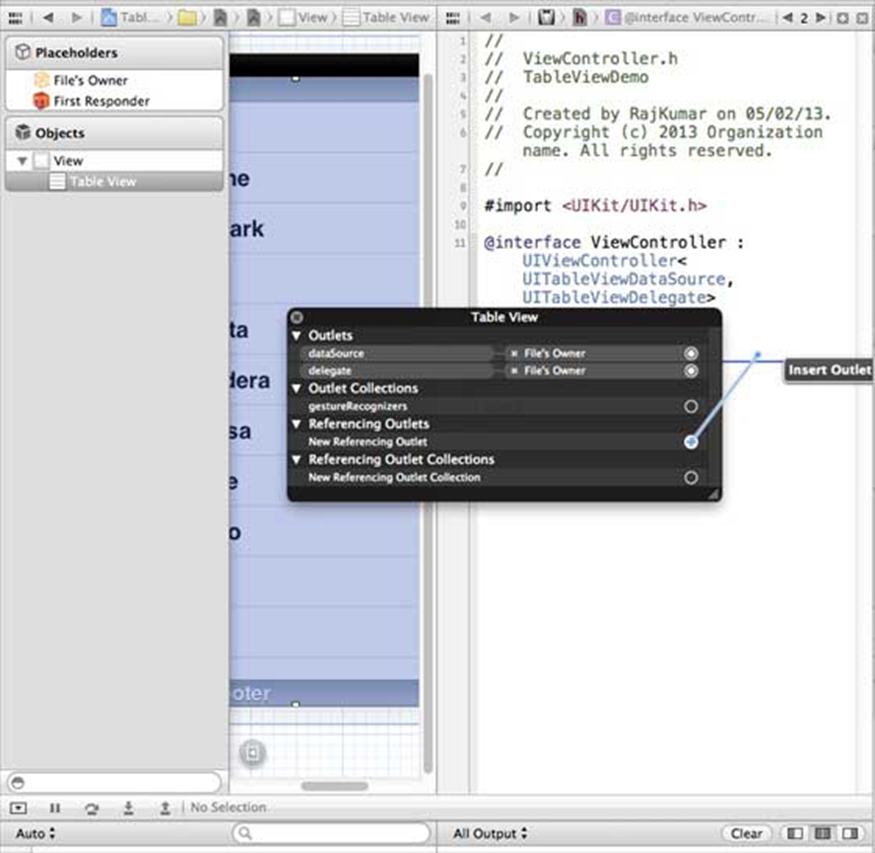
Bước 2 – Đặt ủy quyền và nguồn dữ liệu thành chủ sở hữu tệp cho chế độ xem bảng bằng cách nhấp chuột phải và chọn nguồn dữ liệu và ủy quyền. Cài đặt dataSource được hiển thị bên dưới.

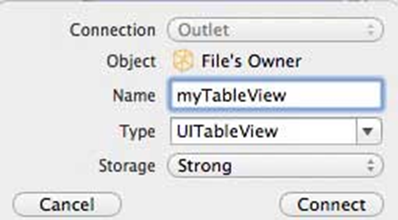
Bước 3 – Tạo IBOutlet cho tableView và đặt tên là myTableView . Nó được hiển thị trong các hình ảnh sau đây.
Bước 4 – Sau đó, thêm một NSMutableArray để giữ dữ liệu được hiển thị trong chế độ xem bảng.
Bước 5 – ViewController chúng tôi nên áp dụng UITableViewDataSource và UITableViewDelegate giao thức. Các ViewController.h nên nhìn như hình dưới đây.
#import <UIKit/UIKit.h>

@interface ViewController : UIViewController<UITableViewDataSource,
   UITableViewDelegate> {
   IBOutlet UITableView *myTableView;
   NSMutableArray *myData;
}
@end
Bước 6 – Chúng ta nên triển khai các phương thức tableview ủy quyền và dataSource được yêu cầu. ViewController.m được cập nhật như sau:
#import "ViewController.h"
@interface ViewController ()
@end
@implementation ViewController
- (void)viewDidLoad {
[super viewDidLoad];
// table view data is being set here
myData = [[NSMutableArray alloc]initWithObjects:
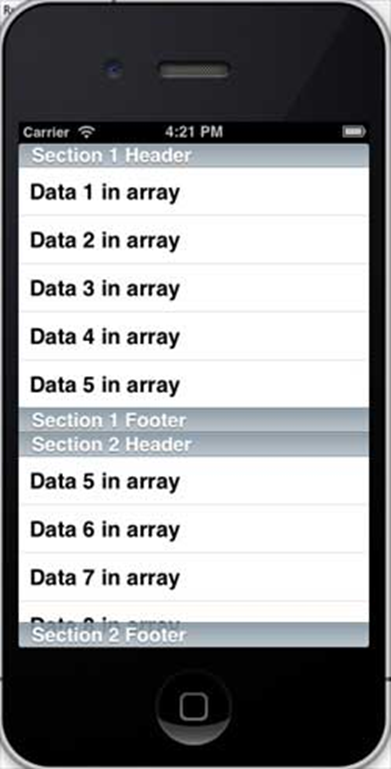
@"Data 1 in array",@"Data 2 in array",@"Data 3 in array",
@"Data 4 in array",@"Data 5 in array",@"Data 5 in array",
@"Data 6 in array",@"Data 7 in array",@"Data 8 in array",
@"Data 9 in array", nil];
// Do any additional setup after loading the view, typically from a nib.
}
- (void)didReceiveMemoryWarning {
[super didReceiveMemoryWarning];
// Dispose of any resources that can be recreated.
}
#pragma mark - Table View Data source
- (NSInteger)tableView:(UITableView *)tableView numberOfRowsInSection:
(NSInteger)section {
return [myData count]/2;
}
- (UITableViewCell *)tableView:(UITableView *)tableView cellForRowAtIndexPath:
(NSIndexPath *)indexPath {
static NSString *cellIdentifier = @"cellID";
UITableViewCell *cell = [tableView dequeueReusableCellWithIdentifier:
cellIdentifier];
if (cell == nil) {
cell = [[UITableViewCell alloc]initWithStyle:
UITableViewCellStyleDefault reuseIdentifier:cellIdentifier];
}
NSString *stringForCell;
if (indexPath.section == 0) {
stringForCell= [myData objectAtIndex:indexPath.row];
} else if (indexPath.section == 1) {
stringForCell= [myData objectAtIndex:indexPath.row+ [myData count]/2];
}
[cell.textLabel setText:stringForCell];
return cell;
}
// Default is 1 if not implemented
- (NSInteger)numberOfSectionsInTableView:(UITableView *)tableView {
return 2;
}
- (NSString *)tableView:(UITableView *)tableView titleForHeaderInSection:
(NSInteger)section {
NSString *headerTitle;
if (section==0) {
headerTitle = @"Section 1 Header";
} else {
headerTitle = @"Section 2 Header";
}
return headerTitle;
}
- (NSString *)tableView:(UITableView *)tableView titleForFooterInSection:
(NSInteger)section {
NSString *footerTitle;
if (section==0) {
footerTitle = @"Section 1 Footer";
} else {
footerTitle = @"Section 2 Footer";
}
return footerTitle;
}
#pragma mark - TableView delegate
-(void)tableView:(UITableView *)tableView didSelectRowAtIndexPath:
(NSIndexPath *)indexPath {
[tableView deselectRowAtIndexPath:indexPath animated:YES];
UITableViewCell *cell = [tableView cellForRowAtIndexPath:indexPath];
NSLog(@"Section:%d Row:%d selected and its data is %@",
indexPath.section,indexPath.row,cell.textLabel.text);
}
@end
Bước 7 – Khi chúng tôi chạy ứng dụng, chúng tôi sẽ nhận được kết quả sau :