Âm thanh và video khá phổ biến trong các thiết bị mới nhất. Nó được hỗ trợ trong iOS với sự trợ giúp của AVFoundation.framework và MediaPlayer.framework tương ứng.
Các bước liên quan
Bước 1 – Tạo một ứng dụng dựa trên Chế độ xem đơn giản .
Bước 2 – Chọn tệp dự án của bạn, chọn mục tiêu, sau đó chúng ta nên thêm AVFoundation.framework và MediaPlayer.framework .
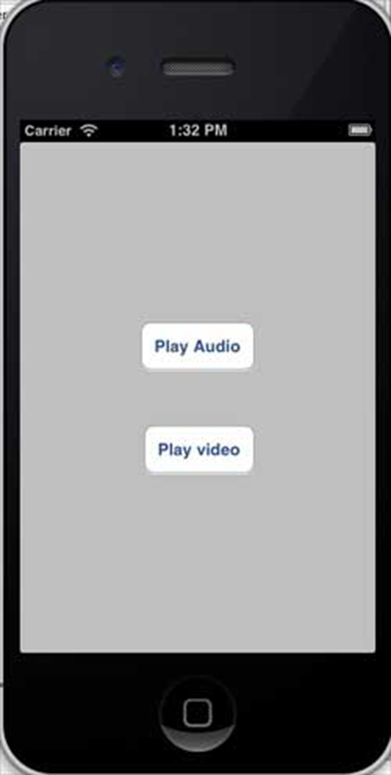
Bước 3 – Thêm hai nút trong ViewController.xib và tạo một hành động để phát âm thanh và video tương ứng.
Bước 4 – Cập nhật ViewController.h như sau:
#import <UIKit/UIKit.h>
#import <AVFoundation/AVFoundation.h>
#import <MediaPlayer/MediaPlayer.h>

@interface ViewController : UIViewController {
   AVAudioPlayer *audioPlayer;
   MPMoviePlayerViewController *moviePlayer;
}
-(IBAction)playAudio:(id)sender;
-(IBAction)playVideo:(id)sender;
@end
Bước 5 – Cập nhật ViewController.m như sau:
#import "ViewController.h"

@interface ViewController ()
@end

@implementation ViewController

- (void)viewDidLoad {
   [super viewDidLoad];
}

- (void)didReceiveMemoryWarning {
   [super didReceiveMemoryWarning];
   // Dispose of any resources that can be recreated.
}

-(IBAction)playAudio:(id)sender {
   NSString *path = [[NSBundle mainBundle]
   pathForResource:@"audioTest" ofType:@"mp3"];
   audioPlayer = [[AVAudioPlayer alloc]initWithContentsOfURL:
   [NSURL fileURLWithPath:path] error:NULL];
   [audioPlayer play];
}

-(IBAction)playVideo:(id)sender {
   NSString *path = [[NSBundle mainBundle]pathForResource:
   @"videoTest" ofType:@"mov"];
   moviePlayer = [[MPMoviePlayerViewController
   alloc]initWithContentURL:[NSURL fileURLWithPath:path]];
   [self presentModalViewController:moviePlayer animated:NO];
}
@end
Ghi chú
Chúng tôi cần thêm các tệp âm thanh và video để đảm bảo rằng chúng tôi nhận được đầu ra như mong đợi.
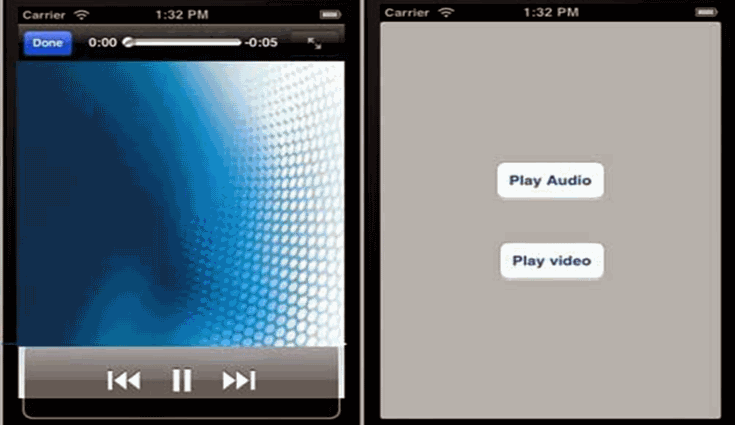
Đầu ra
Khi chúng tôi chạy ứng dụng, chúng tôi sẽ nhận được kết quả sau
Khi chúng ta nhấp vào phát video, chúng ta sẽ nhận được đầu ra như hình dưới đây:

Khi chúng tôi nhấp vào phát âm thanh, bạn sẽ nghe thấy âm thanh.
iOS – Xử lý tệp
Việc xử lý tệp không thể được giải thích trực quan với ứng dụng và do đó các phương pháp chính được sử dụng để xử lý tệp được giải thích bên dưới. Lưu ý rằng gói ứng dụng chỉ có quyền đọc và chúng tôi sẽ không thể sửa đổi các tệp. Bạn vẫn có thể sửa đổi thư mục tài liệu của ứng dụng của mình.
Các phương pháp được sử dụng trong xử lý tệp
Các phương pháp được sử dụng để truy cập và thao tác các tệp được thảo luận dưới đây. Ở đây chúng ta phải thay thế các chuỗi FilePath1, FilePath2 và FilePath thành các đường dẫn tệp đầy đủ theo yêu cầu của chúng ta để có được hành động mong muốn. Kiểm tra xem tệp có tồn tại ở đường dẫn hay không
Việc xử lý tệp không thể được giải thích trực quan với ứng dụng và do đó các phương pháp chính được sử dụng để xử lý tệp được giải thích bên dưới. Lưu ý rằng gói ứng dụng chỉ có quyền đọc và chúng tôi sẽ không thể sửa đổi các tệp. Bạn vẫn có thể sửa đổi thư mục tài liệu của ứng dụng của mình.
Các phương pháp được sử dụng trong xử lý tệp
Các phương pháp được sử dụng để truy cập và thao tác các tệp được thảo luận dưới đây. Ở đây chúng ta phải thay thế các chuỗi FilePath1, FilePath2 và FilePath thành các đường dẫn tệp đầy đủ theo yêu cầu của chúng ta để có được hành động mong muốn.
Kiểm tra xem tệp có tồn tại ở đường dẫn hay không
NSFileManager *fileManager = [NSFileManager defaultManager];
//Get documents directory
NSArray *directoryPaths = NSSearchPathForDirectoriesInDomains
(NSDocumentDirectory, NSUserDomainMask, YES);
NSString *documentsDirectoryPath = [directoryPaths objectAtIndex:0];

if ([fileManager fileExistsAtPath:@""]==YES) {
   NSLog(@"File exists");
}
So sánh hai nội dung tệp
if ([fileManager contentsEqualAtPath:@"FilePath1" andPath:@" FilePath2"]) {
   NSLog(@"Same content");
}
Kiểm tra xem có thể ghi, đọc được và có thể thực thi hay không
if ([fileManager isWritableFileAtPath:@"FilePath"]) {
   NSLog(@"isWritable");
}

if ([fileManager isReadableFileAtPath:@"FilePath"]) {
   NSLog(@"isReadable");
}

if ( [fileManager isExecutableFileAtPath:@"FilePath"]) {
   NSLog(@"is Executable");
}
Di chuyển tệp tin
if([fileManager moveItemAtPath:@"FilePath1"
   toPath:@"FilePath2" error:NULL]) {
   NSLog(@"Moved successfully");
}
Sao chép tệp
if ([fileManager copyItemAtPath:@"FilePath1"
   toPath:@"FilePath2"  error:NULL]) {
   NSLog(@"Copied successfully");
}
Xóa tệp
if ([fileManager removeItemAtPath:@"FilePath" error:NULL]) {
   NSLog(@"Removed successfully");
}
Đọc tài liệu
NSData *data = [fileManager contentsAtPath:@"Path"];[fileManager createFileAtPath:@"" contents:data attributes:nil];iOS – Truy cập Bản đồ
Bản đồ luôn hữu ích để chúng tôi xác định vị trí địa điểm. Bản đồ được tích hợp trong iOS bằng cách sử dụng khung MapKit.
Các bước liên quan
Bước 1 – Tạo một ứng dụng dựa trên chế độ xem đơn giản.
Bước 2 – Chọn tệp dự án của bạn, sau đó chọn mục tiêu và sau đó thêm MapKit.framework.
Bước 3 – Chúng ta cũng nên thêm Corelocation.framework.
Bước 4 – Thêm MapView vào ViewController.xib và tạo một ibOutlet và đặt tên là mapView.
Bước 5 – Tạo một tệp mới bằng cách chọn Tệp → Mới → Tệp … → chọn lớp Objective C và nhấp vào tiếp theo.
Bước 6 – Đặt tên lớp là MapAnnotation với “lớp con của” là NSObject.
Bước 7 – Chọn tạo.
Bước 8 – Cập nhật MapAnnotation.h như sau:
#import <Foundation/Foundation.h>
#import <MapKit/MapKit.h>

@interface MapAnnotation : NSObject<MKAnnotation>
@property (nonatomic, strong) NSString *title;
@property (nonatomic, readwrite) CLLocationCoordinate2D coordinate;

- (id)initWithTitle:(NSString *)title andCoordinate:
   (CLLocationCoordinate2D)coordinate2d;

@end
Bước 9 – Cập nhật MapAnnotation.m như sau:
#import "MapAnnotation.h"

@implementation MapAnnotation
-(id)initWithTitle:(NSString *)title andCoordinate:
   (CLLocationCoordinate2D)coordinate2d {

   self.title = title;
   self.coordinate =coordinate2d;
   return self;
}
@end
Bước 10 – Cập nhật ViewController.h như sau:
#import <UIKit/UIKit.h>
#import <MapKit/MapKit.h>
#import <CoreLocation/CoreLocation.h>

@interface ViewController : UIViewController<MKMapViewDelegate> {
   MKMapView *mapView;
}
@end
Bước 11 – Cập nhật ViewController.m như sau:
#import "ViewController.h"
#import "MapAnnotation.h"
@interface ViewController ()
@end
@implementation ViewController
- (void)viewDidLoad {
[super viewDidLoad];
mapView = [[MKMapView alloc]initWithFrame:
CGRectMake(10, 100, 300, 300)];
mapView.delegate = self;
mapView.centerCoordinate = CLLocationCoordinate2DMake(37.32, -122.03);
mapView.mapType = MKMapTypeHybrid;
CLLocationCoordinate2D location;
location.latitude = (double) 37.332768;
location.longitude = (double) -122.030039;
// Add the annotation to our map view
MapAnnotation *newAnnotation = [[MapAnnotation alloc]
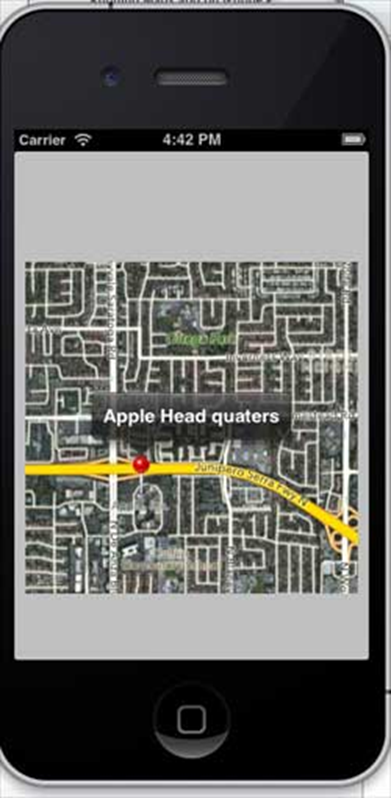
initWithTitle:@"Apple Head quaters" andCoordinate:location];
[mapView addAnnotation:newAnnotation];
CLLocationCoordinate2D location2;
location2.latitude = (double) 37.35239;
location2.longitude = (double) -122.025919;
MapAnnotation *newAnnotation2 = [[MapAnnotation alloc]
initWithTitle:@"Test annotation" andCoordinate:location2];
[mapView addAnnotation:newAnnotation2];
[self.view addSubview:mapView];
}
// When a map annotation point is added, zoom to it (1500 range)
- (void)mapView:(MKMapView *)mv didAddAnnotationViews:(NSArray *)views {
MKAnnotationView *annotationView = [views objectAtIndex:0];
id <MKAnnotation> mp = [annotationView annotation];
MKCoordinateRegion region = MKCoordinateRegionMakeWithDistance
([mp coordinate], 1500, 1500);
[mv setRegion:region animated:YES];
[mv selectAnnotation:mp animated:YES];
}
- (void)didReceiveMemoryWarning {
[super didReceiveMemoryWarning];
// Dispose of any resources that can be recreated.
}
@end
Đầu ra
Khi chúng tôi chạy ứng dụng, chúng tôi sẽ nhận được đầu ra như hình dưới đây –

Khi cuộn bản đồ lên, chúng ta sẽ nhận được kết quả như hình dưới đây